Electronic projects


you are here: home page :: projects :: Miscellaneous :: Miscellaneous :: Mini efficient coil launcher from disposable camera flash

Mini efficient coil launcher from disposable camera flash

Disclaimer: I don't accept any responsibility for the damages done with this device to peoples, things, animals, fragile things etc , if you build it, you must accept this condition.

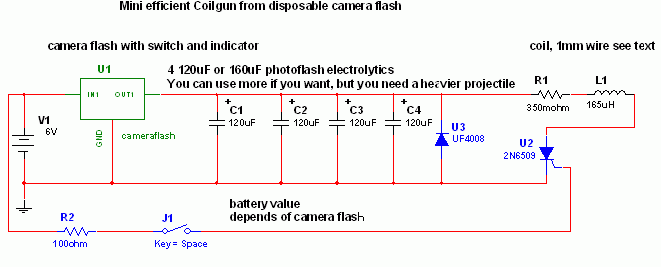
Circuit diagram

This is a fun and non-dangeros project for those people who like to throw projectiles magnetically. It simply works by placing a ferromagnetic projectile at one end of a coil and pulsing some power in it. The trick is to switch off power when the projectile is at the middle of the coil, there are some ways to do it but it isn't important now. The second trick is to use a coil as close as possible to projectile to waximize coupling and the third to avoid saturation, that means keeping the current not to high.
I've been messing with coil launchers for a year. The first model was a straw with some wire wrapped on it and an electrolityc capacitor (200V) pulsed in it. Lots of sparks and metal flying but was able to shoot a nail accross my room. I started esperimentation wrapping wire on glass and using more litycs charged by mains power, very bulky and disappointing (100J of energy where only able to blast through 2 sheets). After holydays I started more mature experimentation employing SCRs (solid state switching) photoflash electrolytics and optical sensors, and built a bi-coil launcher (2 stages), complicated but poweful ( blasted through a can) but the timing is critical, so transient simulations were a must (and a L-C-R meter). The next launcher will be mosfet-switched with 3 coils and optical sensors, but i don't have the funds/parts yet to build such an expensive launcher, but already designed plans and models. For now i decided to build a small funny coil launcher using one scr and coil on glass. Using my LCR meter and multisim simulator i designed it for max efficiency.
For first you need some disposable camera flashes, so try to search at your local photo shop. You need 4 of more of them. Desolder the caps and collect them. They have ratings of 330V 120-160uF and can survive pulses up to 300A (each), or even dead shorts (but don't do it because it is quite a bang). Paralleling them reduces the ESR (internal resistance) and ESL and highers peak current capability. I used 4 of them and my coil launcher has a pulse current of 400A (about 100A for cap). The more caps , the more energy
but more longer pulse, so the additional energy may slow down the projectile instead of fastening it so I would advice to keep them only 4. I trusted the simulations and have almost broken a window with this thing ;-) fortunately the curtains slowed it down .

Concerning the charging circuit, use the largest you got, and try to use more batteries than originally if you want a fast charge. I used a max kodak disposable flash and it works fire with 4 1.5V batteries (originally it was designed to use one) and doesn't burn out. The caps where soldered on a small breadboard with parallel tracks made with lots of solder (otherwise the solder will blow).
The coil was made with 200 turns distributed on 10 layers (rembember to insulate eachover) of insulated magnet wire with 1mm diameter on a glass pipe with 6 mm external diameter and 3 mm internal diameter. Also plastic works good as barrel but must be hard , metals must be NON-Ferromagnetic and must have a cut along the barrel lenght (to limit eddy currents).
The resistance is 350 milliohm and inductance is 165 uH (according to my LCR meter) giving a pulse lenght of 1 ms (Multisim simulation) and peak current of 400A, limited by inductance. Using more caps would increase pulse current because the resistance is low and the current is Inductance-limited, so i advice to use only 4 caps (maximum 5).
Concerning the switching i used 2N6509 SCRs (Onsemi) (25A 800V) which have a pulse rating of 300A x 6 ms (450 x 1ms). They are very good cheap and small and requires small signal to drive. A reverse diode was added to the caps because the simulations showed
a peak reverse voltage in capacitors (it is an undamped LCR circuit) that could damage them. This solution limits reverse charging (to -0.5 V to 1V) and makes the current decay better reducing the such-back effect. The projectile is a 2.5 mm diameter nail with the same lenght as the winding.

When placing the projectile the projectile starting position is critical, make various shots at different positions to see which is better.
Rembember: this circuit is low power but propels metal projectiles at speeds of 20-25 m/s and although can make no harm (to skin)
it would break fragile things, also dangerous for eyes so don't point to peoples's or animals's head . Use it to shoot down small things
or to shoot people's back (but watch who you shoot, some peoples don't like such jokes and you would be in trouble...)
There is alse electrical shock hazard. This circuit stores 30 or more Joules at 310V and can shock you badly, use only one hand
and insulate high voltage sections. Be wise, have fun, learn, and be safe.

author: Jonathan Filippi
e-mail: jonathan.filippi@virgilio.it
web site: http://www.electronics-lab.com
project categories:
folder Audio (49)
folder Power & high voltage (43)
folder Radio (23)
folder Light & LED (31)
folder Tools & measurement (40)
folder Telephone (18)
folder Automotive (10)
folder Microcontrollers (12)
folder Sensors & control (47)
folder Timers & oscillators (40)
folder Miscellaneous (26)

StumbleUpon button

Share this page
Bookmark and Share
project subcategories:
All subcategories
Miscellaneous

similar projects:
7 Segment LED Counter
Cuckoo sound Generator
Digital Step-Km Counter
Digital Stopwatch 0-60sec
Digital Stopwatch 0-99sec
Downed Model Locator
Downed Model Locator II
Economy radar detector
Electronic Locker
IR Remote Control Jammer

recently added projects:
Doorbell for the Deaf
High Quality Intercom
Combinational Conjuring Trick
POT-PLANT POWER
Ultrasonic Dog Whistle
Quiz Circuit
LED Torch
Insect Repellant
Speaker Microphone Circuit
Magic Wand Conjuring Trick.

most popular projects:
Led display digital Voltmeter
500W low cost 12V to 220V inverter
Low pass filter - Subwoofer
High And Low Voltage Cut Off With Time Delay
Metal Detector
2N3055 Power Amplifier
Basic UPS Power Supply
200W audio amplifier
LED Torch
100W RMS Amplifier


DIY Electronics Projects

Promote Your Page Too