Electronic projects |
|
|
|
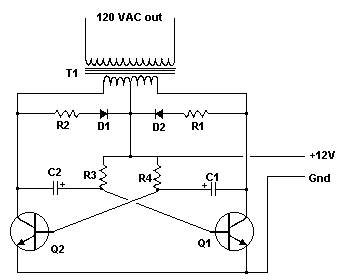
InverterHave you ever wanted to run a TV, stereo or other appliance while on the road or camping? Well, this inverter should solve that problem. It takes 12 VDC and steps it up to 120 VAC. The wattage depends on which tansistors you use for Q1 and Q2, as well as how "big" a transformer you use for T1. The inverter can be constructed to supply anywhere from 1 to 1000 (1 KW) watts. Circuit diagram Parts: Notes: e-mail: web site: http://www.aaroncake.net |
 Audio (49) Power & high voltage (43) Radio (23) Light & LED (31) Tools & measurement (40) Telephone (18) Automotive (10) Microcontrollers (12) Sensors & control (47) Timers & oscillators (40) Miscellaneous (26) Audio (49) Power & high voltage (43) Radio (23) Light & LED (31) Tools & measurement (40) Telephone (18) Automotive (10) Microcontrollers (12) Sensors & control (47) Timers & oscillators (40) Miscellaneous (26)All subcategories power supplies battery chargers high voltage inverters free energy other 12VDC Fluorescent Lamp Driver 500W low cost 12V to 220V inverter 6V to 12V Converter Automotive 12V to +-20V converter (for audio amplifier) Voltage Inverter II Doorbell for the Deaf High Quality Intercom Combinational Conjuring Trick POT-PLANT POWER Ultrasonic Dog Whistle Quiz Circuit LED Torch Insect Repellant Speaker Microphone Circuit Magic Wand Conjuring Trick. Led display digital Voltmeter 500W low cost 12V to 220V inverter Low pass filter - Subwoofer High And Low Voltage Cut Off With Time Delay Metal Detector 2N3055 Power Amplifier Basic UPS Power Supply 200W audio amplifier LED Torch 100W RMS Amplifier DIY Electronics Projects Promote Your Page Too |